And now for something completely different (pt 1)
by TheWatcher on Mar.19, 2020, under General, Hardware
And by “different”, I obviously mean “anything at all”. Normally I wouldn’t write up something like this – which part of the reason this site gets updated so infrequently – but right now I’m not burning a chunk of the day commuting, so what the heck…
Back in the ancient and near-forgotten times of the last days of 2019, our venerable washer-dryer stopped working. This was honestly not overly surprising for a device nearly nine and a half years old, but it was… inconvenient, at the very least. Better yet, it wasn’t showing any error codes! It would simply refuse to run any programs with an “Err” message. In order to find out what was really happening I had to put it into a maintenance diagnostic mode, where it finally gave an error code… except it was an error code that doesn’t appear in the manual! After much consultation with the great Internet Oracle I determined that the error was trying to tell me that either the heater element was out, the heater relay was broken, or that the deep state had infiltrated our lives in a subtle plan to use our washer-dryer as a portal for alien overlords.
Upon opening it up and applying lots of cursing I discovered the real culprit: the relay was fine, as was the heater, but a SMD diode was blown, and a corroded track on the main board had broken. And no trace of aliens, either. I was able to replace the diode with an equivalent scavenged from another old board I had in my pile of it-might-come-in-handy-some-day parts, and solder in a wire to bridge the damaged track, but the machine was obviously not much longer for this world. After much intensive research by my better three-quarters, we bought a new machine and awaited its delivery with baited breath.
And it works great, does a good job, except for one issue: it turns itself off a few minutes after it has finished a program. When the old machine finished a program, it would leave the display on and you could tell there was stuff in there that needed to be taken out… the new one, in the name of power efficiency, doesn’t do that and that has lead to things being forgotten in the machine for hours. Normal timers aren’t useful, because they go off and might be ignored at the time, and then forgotten about.
So, I’ve decided to build something a bit more in line with our needs.
After discussion with my better three-quarters, the main requirements are:
- NO CAPES BEEPS. Beeps are the mind-killer.
- Visual indication that the program is in progress/done, preferably eye-catching to make it easily noticeable.
- Needs to remain on, none of this auto-off shenanigans.
- Simple to operate – this is something in addition to setting the program going, so minimising the faff is important.
- No doing anything that unravels the fabric of reality itself, allowing dark, unliving, unnamable things to crawl from the fathomless void beyond into the fragile circle of firelight we inhabit. Again.
The working plan is for a button to turn the device on, at which point the button light comes on. Once on, pressing the button multiple times sets a rough program time, and if it is held down it turns the device off. A bar graph will indicate time/progress and to allow for a more eye-catching display after the program time is up.
Back in my misspent youth – in the days when Maplin sold actual components rather than overpriced cables, and RS Components wouldn’t even deign to speak to you unless you had a business account and knew the secret handshake – normal people who didn’t have access to serious tools would build something like this with discrete components: counter ICs, LED driver chips, much ingenuity, and a continuous series of creative expressions of frustration. On the other hand, the only sane approach these days is to use a microcontroller board like an Arduino for the control logic. There’s really no sense in trying to implement it any other way, and it also gives the flexibility to change the logic after the fact, rather than have everything locked in cold, unrelenting, unchangeable hardware. An Arduino Nano is more than capable enough for this, and will give scope to expand if additional features are needed later.
As for the rest, the Grove LED Bar is a nicely-built module that takes serial data and drives a multi-colour 10 segment LED bar graph, with intensity control for each LED, and an illuminated push-button switch will round off the controls (because who doesn’t like buttons that light up?)
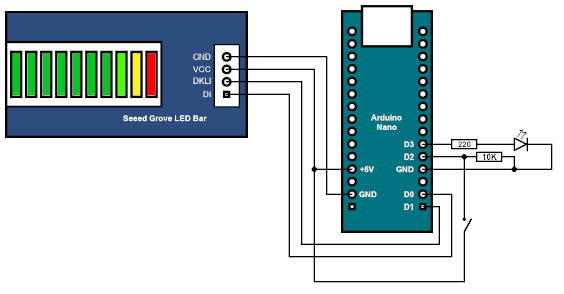
The circuit is almost ridiculously simple, as long as the details of the Nano and Grove LED Bar are glossed over:
Note: I discovered later that D1 and D0 are not good choices here – see part 2 – so the finished thing uses a different circuit than the one given here!
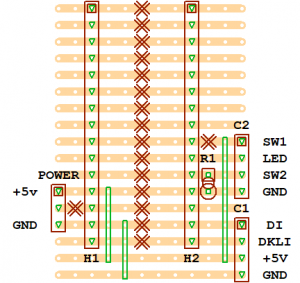
There needs to be a bit of circuit board to neatly provide connections to the Arduino, and for a more complex problem a proper PCB might be worth it. However, in this case a bit of stripboard will be more than sufficient, and that looks something like this:
The illuminated push-button switch presents bit of a problem, however. The Nano’s digital outputs provide 5V when high, and trying to find illuminated push-button switches with 5V rated LEDs is stupidly difficult: there are some out there, but they tend to be obnoxiously expensive. You can easily find 12V, 14V, 24V, even all the way up to 240V versions, but asking for anything below 12V is like asking for gold plated hen’s teeth.
I have a plan to address that, however – and that will be in Part 2.
You must be logged in to post a comment.